Thursday, June 28, 2012

Make your own Non-alcoholic Coconut Extract (or Vanilla)

Glycerin and water is used in place of alcohol to extract the liquid. This can be used in recipes that need no baking for kid-friendly results!

You can buy food grade vegetable glycerin from azurestandard or amazon has several varieties:
NOW Foods Glycerine Vegetable, 16-Fluid Ounces and
Glycerin Vegetable Kosher USP - 1 Quart


I followed pastry pal's recommendations on how to open a coconut. She uses alcohol to extract her flavor, so if you were looking for an alcoholic version, follow her recipe. She also grates her coconut meat. After I peeled mine, I felt it was easier to dice. Decide which is easiest for you!

Brief summary of how to open a coconut (and relieve stress): Hammer Nail into Eyes of Coconut. Drain. Wrap in towel and hammer around the midsection of the coconut on cement (you'll have to hit this hard so don't try it on the counter). Hammer into several chunks. Carefully slice the meat off the husk with a knife, slicing away from you. Use a vegetable peeler to remove any more husk pieces from the meat. Dice or grate.

Non-alcoholic Coconut Extract
Ingredients:
1 c glycerin
1/2 c warm water
1/2 diced fresh coconut meat *see above for preparing coconut(vanilla version below)

Directions:
1. Add ingredients together. Shake vigorously for a couple days. Let sit for 1 month in a cool, dark place.
2. Drain and Use.

Non-alcoholic Vanilla Extract
1 c glycerin
1/2 c warm water
2 vanilla beans, sliced open


I hope you enjoy your coconut extract! Looking forward to making some delicious cookies with this. What do you plan to use it for?

Wondering what to do with leftover coconut meat? Make coconut milk!

Coconut Milk DIY

Prepare the coconut as detailed in this blog post.
Brief summary of how to open a coconut (and relieve stress): Hammer Nail into Eyes of Coconut. Drain. Wrap in towel and hammer around the midsection of the coconut on cement (you'll have to hit this hard so don't try it on the counter). Hammer into several chunks. Carefully slice the meat off the husk with a knife, slicing away from you. Use a vegetable peeler to remove any more husk pieces from the meat. Add 1/2 c diced coconut meat to blender and blend with 2 1/2 c water and pinch of stevia leaf, agave nectar, or honey and 1/3 of a vanilla bean. Strain through sieve (use doubled up cheesecloth if you want to avoid pulp).

ENJOY!

Tuesday, June 26, 2012

6 Things You don't think to Declutter in your Kitchen

Decluttering can be exhausting but also a great way to feel refreshed. I'm still doing our deep spring clean and de-cluttering every room, every nook and cranny. Here are several places that we don't always think to Declutter in the kitchen. Trust me, you'll feel much better when you do!

Happy Decluttering!

"Simplify, Simplify, Simplify!"   ~ Henry David Thoreau


"Everything should be as simple as possible, but not simpler."    ~ Albert Einstein

1. Recipe Box - Do you also think you can make all two hundred of those recipes you've stashed in that box in the corner? I must have thought I had better time management and ate more because there is no way! I even had recipes that were loaded with dairy and wheat flours - I guess it's been a while since I went through this. Twoof them I kept because I'm always intrigued by making a recipe allergen free and delicious but the rest recycled.
Easiest way to do this is dump all the recipe cards out and sort them into five piles, Made it and Loved it, Made it but needs to be tweaked, Made it but didn't love it (there might have been that snuck back in), Never Made it, and Never Will Make it. Throw out the ones you know you won't ever make and the ones you made but didn't love. Look through the Never Made It and ask yourself Why? Why didn't I make this recipe? The ingredients? Was the process too long? The ingredients pricey? If you really still want to try your hand at the recipe, give yourself two weeks from your next shopping trip (don't forget to put the ingredients on your list) to make it. Put it on your fridge as a reminder. But if you don't make it, throw it out. You can always look something similar up on the internet later.


(Do you like my cigar box as a recipe box?)

2. Spice Cabinet - Herbs and Spices do have expiration dates (in a way). They are more like flavor expiration dates - after six months, their flavor fades. Throw old ones out and catalog what ones you use most frequently. Maybe you don't use all 2 oz of that ground cardamom? Buy from a bulk store or Mountain Rose Herbs and share with friends. You could have a great spice-mixing party! Buy spices and make your own mixes - I am now wanting to do this.


3.  Under the Sink/ Cleaning Supples - Do we really need five different bottles to clean five surfaces?
You can replace almost all your cleaning supples with Hydrogen Peroxide, bakins soda and white vinegar (you can remove hard water build up with this simple green trick). Hydrogen Peroxide kills 99.9% of bacteria (just as much as bleach) without the awful chlorine smell. Natural cleaning companies actually sell "chlorine-free bleach" or hydrogen peroxide for an exorbitant price but you can pick up a bottle of it at your local drug store for under $1. Pick up at least two - one for first aid and one for cleaning.


4. Cookbook Shelf - Goodbye Wine Lover's Dessert cookbook I've made one recipe out of that I majorly tweaked! If you have several cookbooks that you only make two or three recipes out of, utilize your recipe box and write those down. Then get rid of the book! You can sell it to hastings or even amazon and invest in some newer cookbooks. Another idea would be to hold a cookbook swap with your friends.


5. Tupperware and Bottles Drawer - I went through Big Blue Eyes' sippy cups the other day and realized I had several pieces that didn't fit together with anything else. Rubber nibble anyone? Did I think perhaps I might need it someday? No thank you.
Check to see if you can recycle any plastic before throwing it away. (Is there some sort of donation where you can donate pieces of bottles - the neck, the nipple, the bottle? Hmmm)

6. Food Magazines - This is right up there with Cookbooks. I realized the other day I had over twelve issues of Vegetarian Times and about two dozen of Whole Living sitting in the magazine rack in the bathroom.... Because you never know when someone might spend 24 hours indisposed reading your food magazines, all five dozen of them. A great rule of thumb is keep the last two issues plus the current issue.


My sister shares my love for vegetarian times so I always pass them on to her. See if there is anywhere you can donate. Usually hospitals or libraries will take them off your hands (and help someone). And then what you can't donate, recycle recycle recycle!

Question of the Day:
To clutter or not to clutter, that is the question! Do you enjoy decluttering? Does it invigorate you or exhaust you?

Monday, June 25, 2012

Green Trick for Ridding Dishwashers of Hard Water Build Up

That is a super long blog title post...  but, then again, most of blog posts are long.


I tried making my own green dishwashing detergent and the dishwasher actually seemed to worsen at washing dishes. Most of our dishes particularly glassware and silverware had some nasty hard water build up. And although they are still clean, this is not good for the dishwasher and they definitely don't look pretty to drink or eat off of.

... So I'm still perfecting a dishwashing detergent but in the meantime, I've used this little trick to lessen the dishwasher's load and help it clean.

Vinegar.

That's right. Plain old white vinegar.

That clear liquid is a miracle worker.

It kills 99% of bacteria, 82% of mold, and 80% of germs (viruses). It is not harmful to you or to little ones and does not carry any harsh chemicals or preservatives.


It also rids the dishwasher of Hard Water build up!

All you need to do is run the dishwasher empty with a little cup of white vinegar below the bottom rack (make sure that the propeller won't topple it when running) and add 10-15 drops of essential oil of your choosing. I used grapefuit because it also cuts grease and smells DIVINE!

And that's it. I know it's a pity to have run the dishwasher empty but it will be thanking you down the road.

Now if you would like to know how to manually clean your dishwasher, you can visit this blog post over at Dandelions on the Wall.

Friday, June 22, 2012

Banana Ice Cream with Nutmeg

I know the whole frozen-banana-into-ice-cream trick is not new but this has been our latest treat and it so delicious so I had to share. With three ingredients this is also super easy to make! You don't even need an ice cream machine - just a handy dandy high speed blender!

Growing up, my mom would make tons of smoothies. One of my favorites was a banana smoothie with either almond or peanut butter and non-dairy milk, topped with freshly grated nutmeg. Talk about childhood inspiration!

Just the smell of nutmeg is memorable. You will need whole nutmeg. This is important. Previously ground nutmeg does not have the flavor or spice of freshly grated.

I also shared this recipe on Allergy-free Wednesdays! Be sure to check it out there.


Banana Ice Cream with Fresh Nutmeg
3 Frozen Bananas
3 T almond butter (or 3 T seed butter)
Whole nutmeg and a grater

In vitamix or other high speed blender, blend frozen bananas, 3 T almond butter, and freshly grated nutmeg (about 10 good strokes on grater). When smooth, scoop into 3 cups and top with freshly grated nutmeg.
ENJOY!

Question of the Day:
Is there a spice or herb that brings back memories for you?

Thursday, June 21, 2012

Creamy Vegan Spinach Artichoke Dip

Yesterday was lovely. Warm temperatures and a light breeze. We walked to the park for a picnic and enjoyed this lovely snack along with vegan marshmallow meringues (anyone interested in this recipe?).


This creamy, vegan and protein-rich dip is just as delicious as it is nutritious. Packed with artichoke hearts and spinach and healthy protein, this snack will boost your day! Eat with carrots, radishes, chips or homemade crackers!
I shared this on allergy-free wednesdays! Be sure to check it out there!
UPDATE: This was featured on allergy-free wednesdays by Real Food, Allergy Free!

There is two ways to make this, depending on what type of canned artichoke hearts you have. If there are in a aluminum can, rinse thoroughly and use first recipe. If they are marinated in a glass can, don't rinse and use second recipe. Both ways are delicious but you may come to like one over the other.

The dip is made with an immersion blender. If you don't have one, feel free to use food processor but grind the sesame seeds alone for a while or crunch them with a mortar and pestle. If you don't do this, the spread will not be as smooth but will still taste good.

Feel free to double the recipe and bring to a party for an appetizer with crudites. This being the hot summer months, we are craving something cold; However baked in the oven until heated for a warm dip would be good. You can also add 1/2 c vegenaise for an even creamier texture. This is not necessary but I've done it before to stretch the leftovers.

As for children, my one year old loves this (I'm losing track of months - 20). I've let her dip chips and lightly steamed carrots into this. It's a great way to get children veggies and healthy protein. My 3 year old nephew also loved it. He kep asking, "Can I have some more of this, please" and would point to the empty part of his plate where the dip had been.

Creamy Vegan Spinach Artichoke Dip
Ingredients
1 1/2 cups white beans (or 15 oz can, rinsed and drained)
1/4 c sesame seeds
1/2 c steamed spinach, chopped (thawed if using frozen)
1 15 oz can artichoke hearts, drained and rinsed
2 t Italian Seasoning herbs
2 T olive oil
1-3 cloves garlic, minced
Juice of 1 Lemon
1/4 t salt

Directions
1. In bowl layer sesame seeds then white beans (Important to put sesame seeds on bottom so they don't fling everywhere), use immersion blender to mash beans and seeds together.
2. Add remaining ingredients and blend with immersion blender.

or 5 ingredient Easy
Creamy Vegan Spinach Artichoke Dip
1 heaping cup artichoke hearts, marinated and sold in glass jars + reserved some of liquid (about 2-3 Tablespoons)
1 1/2 c white beans
1/4 c sesame seeds
1/2 c steamed spinach, chopped (thawed if using frozen)
1/4 t Salt

Blend all ingredients following directions above.


Question of the day:
Have you gone on a picnic yet this summer? What did or would you pack?

Friday, June 15, 2012

Vegan Quesadillas + Homemade Coconut Milk Cheddar

Are you ready for some melted. yummy, delicious vegan cheese?

This stuff is legit. It has all the yummy properties of cheese with none of the stomachache :D


{Pin this}

Look at it! Just sitting here looking at it makes me want to gobble gobble gobble.

I also submitted this to allergy free wednesdays! Make sure to check it out there! UPDATE: This has been featured by the lovely Tessa the Domestica Diva over on allergy-free wednesdays!

Now vegans or lactose or casein intolerant people can have their cheese AND ENJOY it!
This is a doubled recipe. You can feel free to halve it with great results. I like it doubled because then during the week, I can make macaroni and cheese, melted tuna sandwiches, grilled cheese polenta, and so on and so farth. You make ask tuna? Alas, I'm not vegan. At least half of my recipes are so make sure to check the kitchenette link above. Big Blue Eyes and I are highly sensitive to dairy and have eliminated it from our lifestyle. I do admire those who eat a vegan lifestyle and because we eat only sustainable, farm-grown meat or wild game, we also eat a lot of vegetarian meals which minus the dairy and eggs equals vegan.


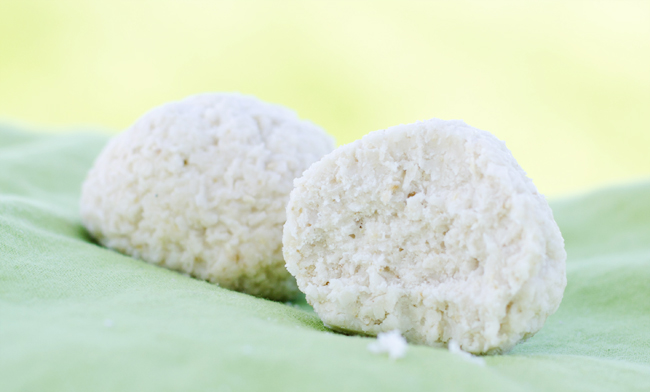
Remember this? This stems from that recipe, which was more of a coconut milk mozzarella.
These are also gluten-free because we used brown rice tortillas from Trader Joe's. You can feel free to use corn tortillas! I also used white balsamic vinegar from Trader Joe's. I have used no other kind of vinegar so I can't vouch for their taste. However Erin from Olives from Dinner uses coconut vnegar. You can order agar flakes from amazon or azure standard and vitacost (here's a $10 credit to use on your first purchase.)


 Coconut Milk Cheddar (UPDATED)
Ingredients:
2 cans coconut milk (full fat, thai kitchen brand prefered)
3 T agar flakes *(see notes below if using agar powder - I primarily use powder now)
1 t white balsamic vinegar
4 T tapioca starch
1 t smoked paprika
1/4 t liquid smoke
2 t sea salt
1/4 c nutritional yeast flakes (optional but definitely gives it more cheesy-ness) - UPDATE
Pinch of turmeric (for more authentic cheese color - optional)

1. Boil coconut milk until no longer seperated. Add white balsamic vinegar, agar flakes, and salt. Boil gently for 15. * (no need to boil 15 minutes if using agar agar powder)
2. Add remaining ingredients, one at a time. Whisking all the while! Cook another 5-10 minutes.
3. Remove from pan and put in greased, flat-bottomed glass dish or parchment paper lined loaf pan.
4. Let cool two hours. You can also stick in fridge when cool and use the next day. Slice and enjoy! (If it's refridgerated, you can actually grate it. It's a little slippery though and easier to just slice).

*UPDATE (please read): Agar agar powder (available on amazon) speeds this wonderful process of vegan cheese-making. With the agar agar powder, you don't have to boil it nearly as long. Use only three teaspoons with the powder. After you add the vinegar, agar agar powder and salt to the milk mixture, let it get a good boil then add all the remaining ingredients one by one whisking all the while. Remove from heat and Place in container.

For quesadillas, add coconut oil to pan and warm the quesadilla while layering slices of cheese one half, fold over when tortilla is warm enough to move easily. Cook on both sides to get a crispy and delicious texture! The cheese willl melt perfectly!


Wednesday, June 13, 2012

Quinoa Breakfast Bowl + Rhubarb Sauce

We've been having the most delicious, nutritious, and filling breakfast lately.

QUINOA!


My sister turned me onto this. She has and always be an inspiration for me!

This is a nice alternative to sugar laden cereals. It's dairy-free, egg-free and gluten-free. It can also be complete allergen free if you use rice milk The quinoa can even be made the night before and just reheated with milk. Enjoy!

When mixed with homemade nut (or coconut  or rice milk), honey (or agave for vegans) and spices or fruit, quinoa turns into this delicious bowl of yummy! The other day I was given some rhubarb from a very inspiring and lovely individual whom we shall call Gracious Granny. And I thought why not have it for breakfast? I usually make a rhubarb crumble but I was so craving it the other morning. This breakfast bowl definitely had the same delicious flavors.

I LOVE rhubarb! Always have, even as a kid. Although I probably ate it with way too much sugar back then.

As for kids, Big Blue Eyes doesn't care much for rhubarb so I omit that from her breakfast bowl. She just likes it with cinnamon, honey, and milk. Plain and simple.

Quinoa Breakfast Bowl
1 c quinoa
2 c water (+ several more for soaking)
Dairy-free milk of choice (I make almond or coconut milk)
Simple Rhubarb Sauce or other toppings of choice or just cinnamon and honey

1. Soak quinoa in several cups of water overnight. (You can omit this step however it's more bitter and less appealing to kids).
2. Strain and rinse well. Add to boiling 2 c water. *
3. Turn to medium low and let simmer for 15 to 20 minutes.
4. Add to bowls, top with milk and desired topping.

*For fluffier quinoa, you can add more water but you may need to cook it a little longer, stirring occasionally.


Simple Rhubarb Sauce
2 c chopped rhubarb (1/4-1/2" pieces)
1 c water
2 T honey (or agave for vegans)
1 T stevia herbal leaf (just the plain old green leaf, dried and crushed with fingertips.
Pinch of cinnamon

1. While quinoa is cooking, boil and then simmer all ingredients.
2. Serve on quinoa, ice cream, pancakes, waffles, or even toast. Enjoy!


Herbal Marshmallow Root Detangler

Mommy Monday on a Wednesday? Yes, but it couldn't wait til next week! (See note at very bottom of post).

Marshmallow Root is supremely amazing for hair! It's mucliganous properties softens the hair naturally while providing easy slip when combing. I originally made this to use for my little one but because it worked so amazing, I've incorporated it into my routine!

{Pin this}
 Here is my litle one after we've used the detangler. She actually posed for me - never happens!

You can personalize this recipe with herbs that are right for your hair type and color. Chamomile is great for blonds. Sage perfect for darkening. Nettle is very nourishing.

Aloe Vera Juice has a ph of 4.5-6 so it's similar to our hair ph. Often, we over shampoo our hair, drying it out which makes it create more oils (which makes us shampoo more so it's just an icky cycle).

I used horsetail and oatstraw because they are high in silica and other nutritive minerals for great hair health.

All these herbs are available from Mountain Rose Herbs.


This detangler is first a decoction with the marshmallow root which we then infuse with horsetail and oatstraw then when cool add aloe vera juice and essential oil.

Herbal Marshmallow Root Detangler
3 cups distilled water (purified will work in a pinch)
2 T marshmallow root
1 T horsetail
1 T oatstraw
1 c aloe vera juice (or so, read directions)
10-30 drops essential oil *optional

1. Make an herbal decoction with the marshmallow root and water - Boil water and add marshmallow root then turn down to simmer for 15-20 minutes.
2. Take off heat and remaining herbs. Let rest at least 15 more minutes.
3. Strain through cheesecloth-lined sieve into bottle when cool.
4. Add aloe vera juice (if the infusion results in less than one cup, I just use equal parts aloe vera juice so its half infusion and half aloe).
5. Spritz on comb or hair and get to work!


P.S. I know I've been amiss lately but my priorites have been elsewhere, as they should be really. I love this blog and will continue to post recipes and ideas but God, my family, and my photography business does come first. (Maybe one day this will help me make money as well - That would be a dream!)
P.P.S Surprisingly, during this break, I made a lot of great recipes that I will be sharing on the blog in the future. The purpose of this break was not to do so but alas I won't stop the creativeness! Be on the lookout the next couple of days for some deliciousness.

I buy my herbs from            Mountain Rose Herbs. A herbs, health and harmony c
Related Posts Plugin for WordPress, Blogger...